
FAQ
customer service line
- +603 86055459
- +6013 389 9491
Frequently Asked Questions
01.
Buildings
How did you fill the inner space between the printer walls of the BOD?
- If you choose to print hollow walls, the inside will usually be used for insulation. The insulation can be any type of granular insulation which can be poured or blowed into cavities. We recommend using recycled insulation materials like paper wool or EPS or whatever is available locally for your region.
- You can also use the inner part of the walls for structural elements like columns.
What is the construction process?
This topic is covered in detail during training when you receive your printer.
The process will vary from project to project, but a standard building will consist of:
- Site preparations o Printer installation
- Printing outline of slab / foundation o Printing walls for ground floor
- Installing deck
- Repeat for multi-story buildings
- Closing the house (roof, windows, doors) o Finishing (paint, floors, electricity, HVAC)
Do you give support regarding building codes?
We do support to the extent it is possible, but due to hugely varying building codes, you should always align your drawings and designs with a local structural engineer
What about plumbing and electrical installation?
This will be done manually in traditional way, but the printer can help you with preparing for it.
Can you hang cupboard, etc. on walls?
Of course you can.
What about the wall finishing?
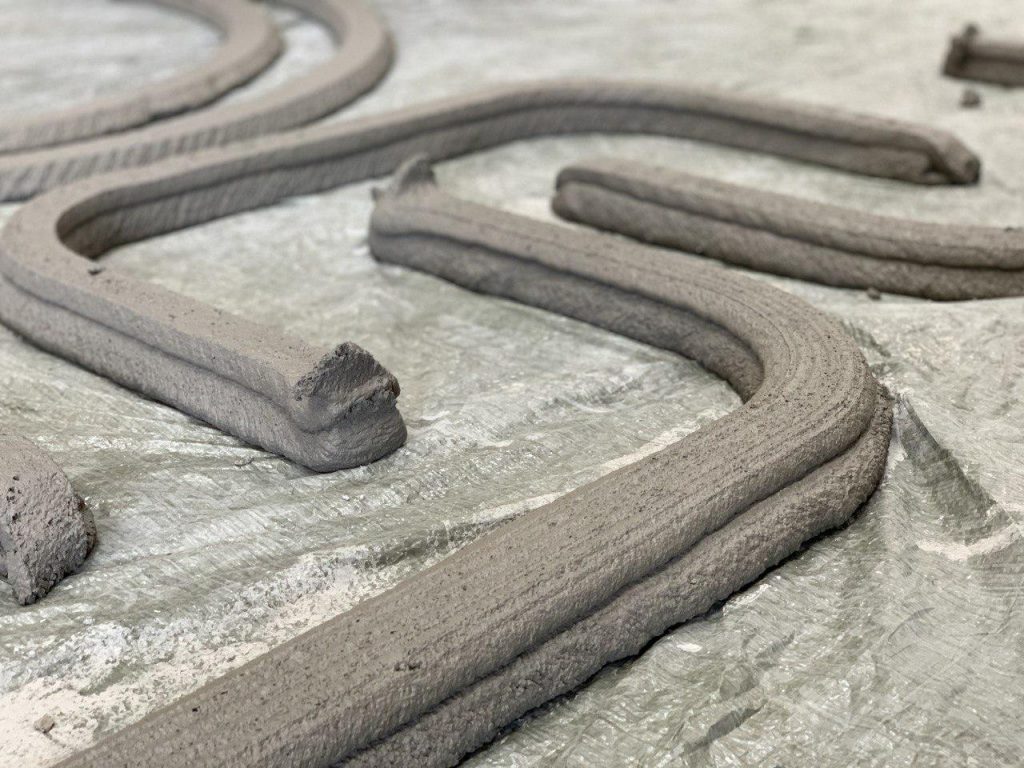
Clients can opt for the typical 3D printed wall facade with the horizontal sausage linings or have it smoothed out with the COBOD BOD2 printer’s flaps attached to the printhead.
For other types of finishing, as with the conventional method, the process is completely up to clients or end-users. Walls can be plastered and painted, or it can be painted directly on the printed surface.
How are repairs and maintenance for walls handled?
Maintenance and repairs of walls will be depending on which material you use, and what surface treatment has been used (paint, plaster, etc.).
Can the foundation be printed?
Yes, in many cases it makes sense to print at least the outline of the foundation to ensure that it fits perfectly to the printer house. Afterwards it can be reinforced, filled and cast according to local code.
What about windows and doors of the building?
Holes for windows and doors are printed directly from the drawing. After printing, you can insert the type of windows and doors you want. The printer code should be adjusted (done with software) so it stops and gives time to place lintels on which the printer will continue to print
How long does it take to finish a building – everything included?
It depends on the building size, material properties and local environment as well as the experience of the printing team.
Suitable printer for my project
COBOD BOD2 printers are modular in nature and configurable in size via its length, width and height, denoted as the x,y, and z axis. As each client has different projects in their pipeline, we would advise our clients that the measures to be considered before selecting printer that fits them best, would generally be identified below:
- Print Area (PA) – Area size (width x length x height in meters ) of
building you would like to print
- Installation area (IA) – Area needed to setup the BOD2 printer
- Workability – methodology to achieve desired structure
We can discuss this further over a simple conversation with us. Do send us an email at admin@kabina.com.my for any enquiries.
Incorporate design with reinforcement
The COBOD BOD2 printer is merely a tool for construction, allowing the clients or
end-users to decide the best practice for their context development or project.
However, you may add reinforcement in the design. The outline that acts as the
formwork can be printed first, then you can cast after the outline has finished printing.
For our show house unit in CIDB, we will not be using any reinforcement. Hence, the
wall acts as a load bearing wall.
How the extruded concrete bonds with the casted foundation?
Clients and end-users can straight away print the concrete on a clean surface. The weight of the wall will keep the structure in place. Should the client or end user wish to incorporate concrete glue to strengthen the bonding, they may decide to do so.
What is the limitation in terms of design if I were to print overhang structure?
Depending on the material the clients or end-users decide on. However, COBOD has reported in their testing that they have managed to achieve 30 degrees overhang from the vertical wall.

02.
Company
Do you have distributors in XYZ country?
Currently KA Bina is the sole distributor of COBOD 3D Printer Construction
Machine for both Malaysia and Singapore
We are not a construction company, therefore COBOD does not build houses, except when there is a need for testing or for other development purposes.
- We can possibly get you in contact with a local client or distributor who can help if there are any in your country or area.
Do you have any project information?
We can share some project information on request to admin@kabina.com.my
03.
Materials
Do you also supply printing materials?
No, we do not. We are open source and we advise our customers to always source materials locally
Does the material need to be vibrated?
Vibration of material can be used in some cases to keep the material from hardening in the system. Under normal conditions we do not vibrate the material.
The hardening time is strongly dependent on weather conditions and your mix design.
We use the term ‘layer time’ to define the time from a layer that has been placed and until a new layer is printed on top. This time can be set in the software and must be adjusted to the specific material used for your project.
Yes, additives can be used.
What are additives used in making the concrete?
The clients or end users would determine and locally source (if they decide so) the composition (which includes the additives), that works best for their context developments or projects, as long as it is printable. However, COBOD does provide their own additives for sale to clients. The use of additives heavily depends on weather, required layer time and the composition of concrete. In general, the main additives usually used are accelerator, super plasticizer and stiffener. We can advise the template material recipe mix clients can use, as well as a service provided to assist clients in developing the recipe that works for them.
What kind of raw material/ concrete do you use for 3DCP?
Similar to the conventional method, clients or end users can opt to use sand, aggregate, cement and additives. Important to note, that the concrete/mortar composition is NOT dictated by COBOD. The end-users or clients would determine and locally source (if they decide so) the composition that works best for their context developments or projects, as long as it is printable. We can advise the template material recipe mix clients can use, as well as a service provided to assist clients in developing the recipe that works for them. It is entirely up to the clients or end-user on the composition of concrete/mortar to be printed by using COBOD printers. This flexibility effectively makes COBOD a superior choice to its other competitors.
We believe that the clients or end-users should be able to source the required recipe for their context developments or projects locally, as well as given the flexibility to venture into new types of material that is suitable and economical for their projects. The COBOD BOD2 printer is merely a tool for construction, therefore the question of raw material/ concrete used is entirely up to the end-users as long as it is printable.
For example, based on the construction of BOD house (Europe’s 1st 3D printed home) by COBOD, they used concrete that comprises of:
- 4-8 mm gravel
- 0-8 mm crushed tiles (recycled)
- 0-2 mm sand
- Portland Cement
- Super-plasticizer
- PP crack stop fibers
What is the water to cement ratio for concrete?
The material recipe used is NOT dictated by COBOD. The clients or end-users would determine and locally source (if they decide so) the composition that works best for their context developments or projects, as long as it is printable.
For the construction of BOD house (Europe’s 1st 3D printed home) by COBOD, the water to cement ratio is ~0:3
What is the strength of concrete?
The concrete strength for 3DCP is highly customizable depending on the concrete recipe the clients or end-users decide to use. The concrete/mortar composition is NOT dictated by COBOD. The clients or end-users would determine and locally source (if they decide so) the composition that works best for their context developments or projects, as long as it is printable and is suitable for your project (i.e. providing the required structural integrity). After all, the concrete strength depends on the design requirement of the building/structure.
For reference, the material used for the BOD house is able to sustain a compressive strength of 52MPa.
Integration of materials, can the materials be mixed with any other material? The concrete/mortar composition is NOT dictated by COBOD. The end-users or clients would determine and locally source (if they decide so) the composition that works best for their context developments or projects, as long as it is printable. We can advise the template material recipe mix clients can use, as well as a service provided to assist clients in developing the recipe that works for them. It is entirely up to the clients or end-user on the composition of concrete/mortar to be printed by using COBOD printers
In fact, KA Bina is working closely with UTHM to incorporate kenaf as filler in our concrete recipe.
What is the cost of materials?
The cost of the materials depends on your local prices on concrete, aggregates, sand and other chemicals like accelerators. This is depending on your concrete mix design that you want to apply for your projects.
04.
Pricing
The shipping cost depends on the printer size and shipping destination.
Do you have examples of project cost overviews?
The cost will depend on the local cost of labor and concrete materials in your country.
What is included in printer costs?
Included in the printer cost is a complete printer with all the necessary parts to print:
- The number of modules for the specific size ordered
- A fully assembled print head and 1 steel nozzle of 50x20mm o 2 network cameras to overview the extrusion of material
- Power cable
- External safety and control switch
What is the cost effectiveness using your printer?
The cost advantage mainly comes from the lower labor usage and the faster completion of the project, in addition to assuring fewer mistakes and need for coordination, as the printer takes care of many operations. The speed with which you can print and execute a project will depend on your previous experience. Hence, you will be much faster once you have it done a few times.
Can we get quote for the machines?
- You can get a formal quote by writing to admin@kabina.com.my
After buying a printer we also provide technical support and hotline support
You can print with the printers as is, as materials can be fed by buckets to the print-head. However, this will be a slow process. To print with speed you will need a pump and mixer, and preferably a silo for the materials storage, which you can acquire at us. If we supply it, we will assure they are delivered with the entire materials flow (from silo over the mixer to the pump and up to the printer) is digitally controlled, such that the feeding of the materials to the print-head is managed by the printer itself and does not require an operator to get involved.
What does it cost to print one square meter?
It is impossible for us to give a general amount as it depends on the wall design that
you choose, local materials costs, cost of people who are overseeing the print, etc.
It is premature to give a general amount. Similar to conventional methods, the cost
per square foot depends on the design of the house, wall design that you choose, local
material costs, cost of labor, the quantities of houses to be built, etc.
We cannot provide the costing for material generally. The material recipe used is
NOT dictated by COBOD. The clients or end-users would determine and locally
source (if they decide so) the composition that works best for their context
developments or projects, as long as it is printable. Therefore, the cost of materials
depends on local prices of concrete, aggregates, sand, chemicals like accelerators, and
other materials clients or end-users decide to use.

05.
Printer
Each project may require a different size of printer. For this you need to keep in mind two measure before selecting the printer that fits you the best:
- Print Area (PA) which is the area size (width x length x height in meters) of building you would like to print
- Installation Area (IA) which is the area needed for the BOD2 printer
-
You can see different printer sizes here:
https://kabina.com.my/home/3d-construction-printer/
To read the size list correctly, pay attention to PA and IA measurement. Each cell shows these measurements which are Width x Length x Height in meters. You can see the number of modules for length on the left side (rows) and the width modules on the top (columns), the height, in terms of no. of modules in the height, is marked red above the table. Meaning that each table/page has different number of height modules.
Suitable printer for my project
COBOD BOD2 printers are modular in nature and configurable in size via its length, width and height, denoted as the x,y, and z axis. As each client has different projects in their pipeline, we would advise our clients that the measures to be considered before selecting printer that fits them best, would generally be identified below:
- Print Area (PA) – Area size (width x length x height in meters ) of building you would like to print
- Installation area (IA) – Area needed to setup the BOD2 printer
- Workability – methodology to achieve desired structure
We can discuss this further over a simple conversation with us. Do send us an email at admin@kabina.com.my for any enquiries.
Can the printer be set up on uneven surfaces?
The COBOD printer can be set up on uneven surfaces where its legs may not be placed on the same height. The clients or end-users would just need to calibrate the printer during the installation process on site.
Can the printer print on uneven surfaces?
The COBOD printer is able to print on uneven surfaces. The printhead is equipped with a sensor to map the surface and make the necessary adjustment to print on the surface ensuring a levelled printing results.
Productivity rate of the printer
The printer’s maximum speed is 1m/s (rE). The standard nozzle size that is usually commissioned is 50mmx20mm. Hence, if printing at maximum speed with the said nozzle, the material flow rate is 3.6m3/hr.
Is it possible to add more modules later?
Yes, it is possible later on to add modules as the printers are modular, they can be upgraded at a later time. That means, you can stay up to date with our technology.
How to upgrade printer from BOD2 to BOD3
COBOD printers in the market today are named “BOD2”, denoting the nature of the printer being the 2nd version of the technology (the only 2nd version of any 3D construction printer in the world). With BOD3 set to be released tentatively in Q3 of 2022, rest assured that the BOD2 printer is modular in nature which allows it to be upgraded/downgraded with the latest tools of the BOD3, depending on your project requirements. As and when the BOD3 is released, clients can opt to purchase additional components of the BOD3 and install them to their current printer, effectively making BOD2 upgradeable.
How fast you can print or build a certain structure?
- How fast you can print a certain structure depends on many factors, such as print/building size, material properties, operation workers’ experience and other project management factors. It is also important to know about the wall design (single wall or double wall with cavity between the walls).
- The printer has a maximum speed of 100 cm/sec. The ability use more or less of the full speed depends on the size of the pump, the materials to be used and other factors.
- Smaller buildings less than 50m2 can be done in one day.
The maximum dimensions of a standard made-to-order printer are 15 meter in width and 10 meters in height. There is no limit in terms of the length of the printer since it is a modular printer. The biggest COBOD BOD2 printer delivered had configuration measurements of 12 x 27 x 10 meters (width x length x height)
How flexible is your 3D printer?
The printer offers flexibility in two major aspects, mechanical and material.
In the mechanical sense:
- Due to its modular nature, clients can dictate the size of the printer it would need to meet the project requirements.
- The BOD2 printer can be upgraded to BOD3 when the new version is released. Clients would simply need to purchase the additional components and install them after.
- It is IP67 certified, effectively making it water resistant and able to withstand the tropical climate.
- The range of printable areas start from smallest(1990mmx2020mmx570mm) to largest(14620mmx50010mmx8140mm).
Other benefits listed in the brochure at **
In the material sense, the concrete/mortar composition is NOT dictated by COBOD. The clients or end-users would determine and locally source (if they decide so) the composition that works best for their context developments or projects, as long as it is printable. We can advise the template material recipe mix clients can use, as well as a service provided to assist clients in developing the recipe that works for them. It is entirely up to the clients or end-users on the composition of concrete/mortar to be printed by using COBOD printers.
Is it possible to build 2 story buildings?
It is possible to print up to 10 meters in the height with the current printer, therefore it is possible to make even 3 story buildings
Do you need any foundation for the printer?
Yes, the printer must be installed either on pre made concrete blocks/feet or can be mounted on existing concrete slab.
How to do maintenance for the printer and how often?
- It is important to clean the printer (wash out concrete) after each print, as well as the parts where machine interacts with concrete. Typical daily cleaning takes 20-30 minutes.
- Maintenance and cleaning schedules are found in the user manual, which we provide to our customers. The manual is equipped with all the necessary information and detailed descriptions.
What about mixer pumps and their maintenance?
Maintenance of mixer pumps are clarified in the Specific manual for the type of mixer/pump
How long does it take to set up the printer?
- It depends on how much experience you have in setting up the printer
- A well experienced team can setup the printer in less than 4 hours, and even less time when concrete feet are used for the installations
- Larger printers (more than 4-5 modules in length and width) require more time
06.
Technical
When do we install the electrical conduit?
The COBOD BOD2 printer is merely a tool for construction, allowing the clients or end-users to decide the best practice for their context development or project. Whether the clients or end users decide to install the electrical conduit while printing the wall, or after its completion is entirely up to them. However, we would recommend since the printing of the wall is on a layer by layer basis, it would be easier if the installation of the electrical conduit is done concurrently with the printing process
How to generate the print file to control the printer?
The print file is generated automatically in COBOD’s slicer “COBOD Slice”. This piece of software takes a STP or IGS file as input, which can be exported by any normal 3D CAD software used for making the building drawings. No programming is needed for making the print file. The slicer takes care of it automatically.
You choose your preferred settings for the print i.e. speed and height of the layers and COBOD Slice generates a printing file that can be executed by the BOD2 printer.
What should I do if the electrical conduit is installed wrongly after the printing has been done?
Similar to the conventional method, clients or end-users can cut the wall where they’d want to place the electrical conduit at, whereas the opening made for the wrongly installed electrical conduit can be plastered.
How electrical conduit is installed when building houses by using 3DCP?
The first step is to determine where you want to place the electrical point in the wall centerline design by having a void/hole at the electrical point location. By doing this,
The printer would not be printing on the designated area that is the electrical point location.
Since the printer is printing the wall layer by layer, the printer will skip the void/hole from its printing route. When the printing wall reaches the overhang level, a metal sheet can be placed that acts as the supporting structure/lintel for the electrical point. Clients or end users can also use a polystyrene cube to serve the same purpose as the metal sheet.
What is the electrical power supply for the printer?
The printer needs 32A, 400V 3 Phase. To power up the whole 3DCP operation for on-site concrete mix, a 60kVA generator would be sufficient for the off-grid printing project. Please list out the energy requirement of the equipment’s.
Printer – 32A 400V Mixer – 35A 400V Pump – 32A 400V
Hence, total power requirement to run the whole 3DCP set up is 39.6kW.
The duration in completing one unit
For any projects our clients or end users are involved in, the printing duration is dependent upon the design of the structures to be printed, printer parameters that include printing speed, movement speed, lifting speed and layer time limit. However, if you have a 3D design of the model, we can advise you on the printing time and amount of material needed for the model using COBOD’s proprietary slicer. (will be included as part of the printer purchase for clients)
Can the printer be exposed to rain?
Yes, all components of COBOD BOD2 printer are made based on IP67 standards, thus making it safe for use and exposure to the elements in a tropical climate.
Can the printer be used if it’s raining?
Yes, clients may consider printing in the rain. However, as with conventional methods, the printed structures need to have a means of cover from the rain water as it might affect the material composition or even be washed off. As for the COBOD machineries involved, the only other equipment we would recommend for cover is the mix batch plant as the open top compartment (to place the sand, cement, etc.) would be exposed to rain and affecting the material mix.
Can the printer detect any error when the printing is in progress?
The COBOD printer movement runs on servomechanism which allows automatic adjustment when an error is detected during the printing operation.
For example, if the printhead crashes to the platform, the printer will adjust the position of the printhead by moving it upward along the z-axis. On the printhead as
well, there is a signal lamp installed to inform the operator of the error detected so that prompt action can be made to resolve the issue and avoid long downtime.
What are the components of 3DCP?
The above is a diagram of a typical layout of COBOD 3D printing operations. The components involved are the printer, pump and mix batch plant.
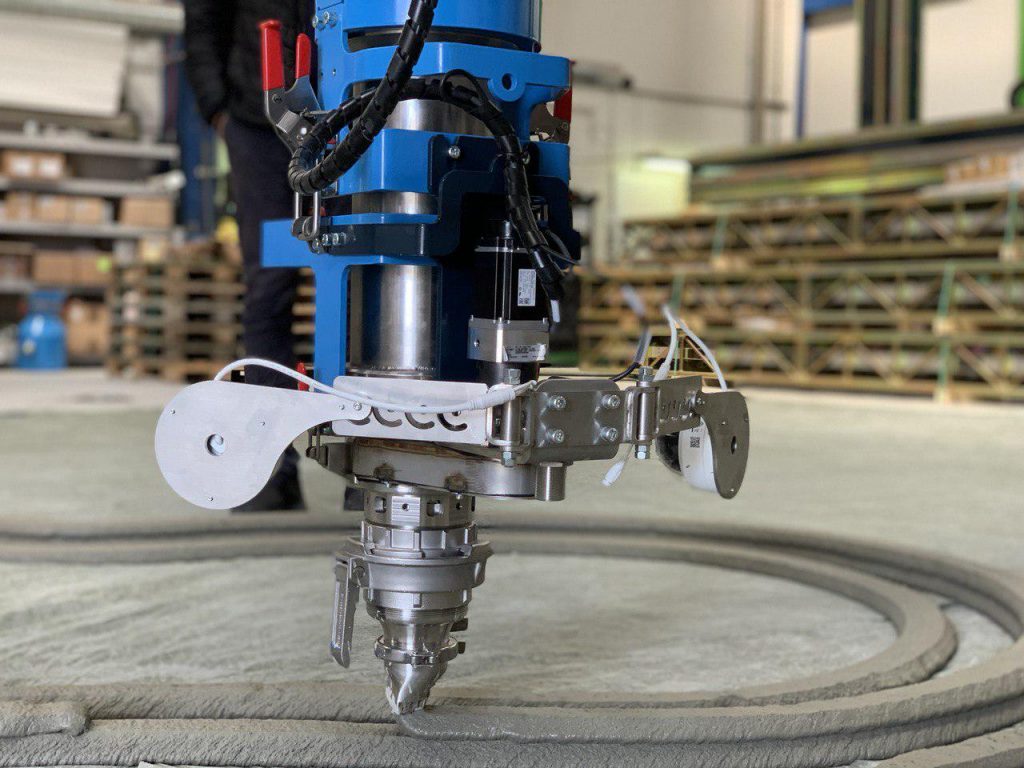
Can you provide information about nozzles and print heads?
- R&D nozzles can be 3D printed on normal desktop FFF 3D printers. They typically break after low to moderate use but are much cheaper for development than stainless steel
- Printing nozzles are typically made from stainless steel. Note that these nozzles are used for industrial/large scale printing and can be any size you desire.
- The print head that comes with the BOD2 is a general-purpose print head with sensors monitoring material level in the material hopper. This enables automatic control of the material supply pump.
- Additionally, a tangential control nozzle can be purchased which enables rotational nozzle for printing with flaps and getting much better surface quality and straight walls with less need for plastering
Can you extend the printing area by moving the printer?
Yes, the printer can be moved to cover larger print areas.
What is the optimal printing environment?
- The printer can handle a lot of variance in the environment and is safe to operate in rainy conditions, as all cables etc. are made according to the IPD67 standards.
- However, printing in rain is generally not recommended, as the rain will ruin the concrete extruded. Rain and high wind speeds can also break down the fresh printed concrete, so in regions where this type of weather is normal, some type of climate protection is recommended. It could be in the form of a tent or some simple cover.
Maximum printer width, length and height measurement.
The maximum dimensions of the printer are 15 meters in width, 10 meters in height and unlimited in length. The biggest printer we have delivered had measurements of 12 x 27 x 10 meters (width x length x height)
What about inclined or overhang printing?
-
- Inclined or overhangs (non vertical walls) can be accomplished with the BOD2. The degree that is possible to print is depending on material properties and geometry
- For very stable / self-supporting geometries, the printer has managed to print up to 30 degree overhangs (measured from vertical walls).
How to generate the print file to control the printer?
- The print file is generated automatically in COBOD’s slicer ‘COBOD Slice’. This piece of software takes a STP or IGS file as input, which can be exported by any normal 3D CAD software used for making the building drawings. No programming is needed for making the print file. The slicer takes care of it automatically.
- You choose your preferred settings for the print. That is, speed and height of the layers and COBOD Slice generates a printing file that can be executed by the BOD2 printer.
What is the lifetime of the printer?
The printer and related equipment have been designed, constructed and manufactured with a minimum expected lifetime of 5 years, but we expect the lifetime to be even longer.
07.
Terms
4 months.
We offer a warranty of 1 year.
What support do you give for the first project?
We provide support for our customers on their first project. After the purchase of the printer we provide technical support and hotline support
In general, the usage of 3D printer machines helps a lot in terms of cost effectiveness and the cost advantage mainly comes from the lower labor usage The cost effectiveness here is referring to the formwork, material used, labour usage and faster completion time.
Unlike conventional methods, building homes with a 3D printer does not require you to build a formwork since everything can be done by the printer. The material used will also help to prevent wastage as the printer will help to accurately determine the amount of materials needed in printing your project. In terms of labour usage, only one person is needed to operate the machine. And it only takes 2 days to completely print a 1300sq feet project.
How are you going to build affordable homes?
In general, the usage of 3D printer machines helps a lot in terms of cost effectiveness and the cost advantage mainly comes from the lower labor usage The cost effectiveness here is referring to the formwork, material used, labour usage and faster completion time.
Unlike conventional methods, building homes with a 3D printer does not require you to build a formwork since everything can be done by the printer. The material used will also help to prevent wastage as the printer will help to accurately determine the amount of materials needed in printing your project. In terms of labor usage, only one person is needed to operate the machine. And it only takes 2 days to completely print a 1300sq feet project.
Are you planning on becoming a contractor as well?
We are now focusing solely on selling the 3D printer. However, we are open to collaborate with projects that support our mission to establish 3DCP technology further in Malaysia and Singapore.

Contact Us
customer service line
- +603 86055459
- +6013 389 9491